
Introduction to Furniture Transfers
Furniture transfers are decorative decals or images designed to embellish furniture pieces, allowing individuals to revamp their décor without requiring advanced painting skills. Popular in the realms of DIY projects and furniture upcycling, these transfers are a practical and efficient solution to transform outdated or nondescript furniture into stylish, attention-grabbing items.
The appeal of furniture transfers lies in their simplicity and broad applicability. Home enthusiasts can choose from a variety of transfer types, including rub-on transfers, adhesive transfers, and water slide decals. Rub-on transfers, as the name suggests, require applying pressure with a tool to transfer the image onto the furniture. Adhesive transfers function similarly to stickers, adhering directly to surfaces, while water slide decals are immersed in water before sliding onto the furniture piece. Each type has its unique application method, ensuring there is an option suitable for diverse project needs.
One of the primary advantages of employing transfers for furniture is the extensive range of designs available. Whether one is aiming for a vintage look, a modern aesthetic, or an eclectic blend, there is a transfer design that meets those preferences. This variety provides users the flexibility to personalize their items accordant to evolving tastes without significant investment.
Moreover, the use of furniture transfers can be remarkably time-efficient. Traditional painting techniques can be time-consuming, often requiring multiple coats and precision to achieve a polished look. In contrast, transfers allow for quick application, streamlining the process of furniture transformation. They also eliminate the mess and complexity that generally accompany painting projects, making them an especially appealing option for beginners or those with limited time.
In summary, furniture transfers present a versatile, user-friendly, and cost-effective method for upcycling and personalizing furniture. Their simplicity and design variety make them valuable tools in interior decoration, helping individuals infuse new life and character into their homes with minimal effort.
Materials and Tools Needed
Successfully applying transfers for furniture necessitates the use of several essential materials and tools. The primary item required is transfer sheets, which come in various designs and can significantly enhance the visual appeal of your furniture. Choosing high-quality transfer sheets is crucial; look for those that are well-reviewed and provide clear, vibrant designs.
A clean cloth is also indispensable. Its primary function is to ensure the surface of your furniture is free from dust and debris before application, which is vital for ensuring that the transfer adheres properly. Scissors are another fundamental tool you’ll need to trim the transfer sheets to fit the desired spaces on your furniture accurately.
A burnishing tool or a sturdy spoon is used to rub the transfer onto the furniture’s surface firmly. A dedicated burnishing tool usually yields the best results, but a spoon can serve as a sufficient alternative in a pinch. This tool helps to secure the transfer onto the surface and ensure that it sticks without any gaps or bubbles.
To protect the completed transfer, a clear protective finish is recommended. This could be either clear wax or polyacrylic. Clear wax offers a softer, more vintage look, while polyacrylic provides a more durable, hard-wearing finish. Choose the protective finish that aligns best with the overall look and functionality you desire for your furniture piece.
Optional items that can enhance your process include painter’s tape and a tape measure. Painter’s tape allows you to secure the transfer sheets in place before final application, which is particularly useful for ensuring precise alignment. A tape measure can help achieve exact placement, which is vital for maintaining symmetry and professional-quality results.
By assembling these materials and tools, you will be well-prepared to apply transfers for furniture with high efficacy and beautiful results.
Step-by-Step Application Process
Applying transfers for furniture can transform an ordinary piece into a stunning focal point. To achieve the best results, it’s essential to follow a meticulous step-by-step process. Begin with surface preparation, ensuring it is clean, smooth, and dry. Use a mild cleaner to remove dust, dirt, or grease, and allow the surface to dry completely. Sanding the furniture lightly may be beneficial, especially if it has an uneven texture. This step ensures the transfer adheres properly, enhancing its longevity.
Next, plan and measure to position the transfer accurately. Use a measuring tape and level to mark where the transfer will go, ensuring symmetry and balance. This step is crucial for visual appeal, particularly on larger pieces where misalignment could be noticeable. Once satisfied with the placement, cut the transfer sheet into sections if necessary, especially when dealing with intricate designs or multiple transfers.
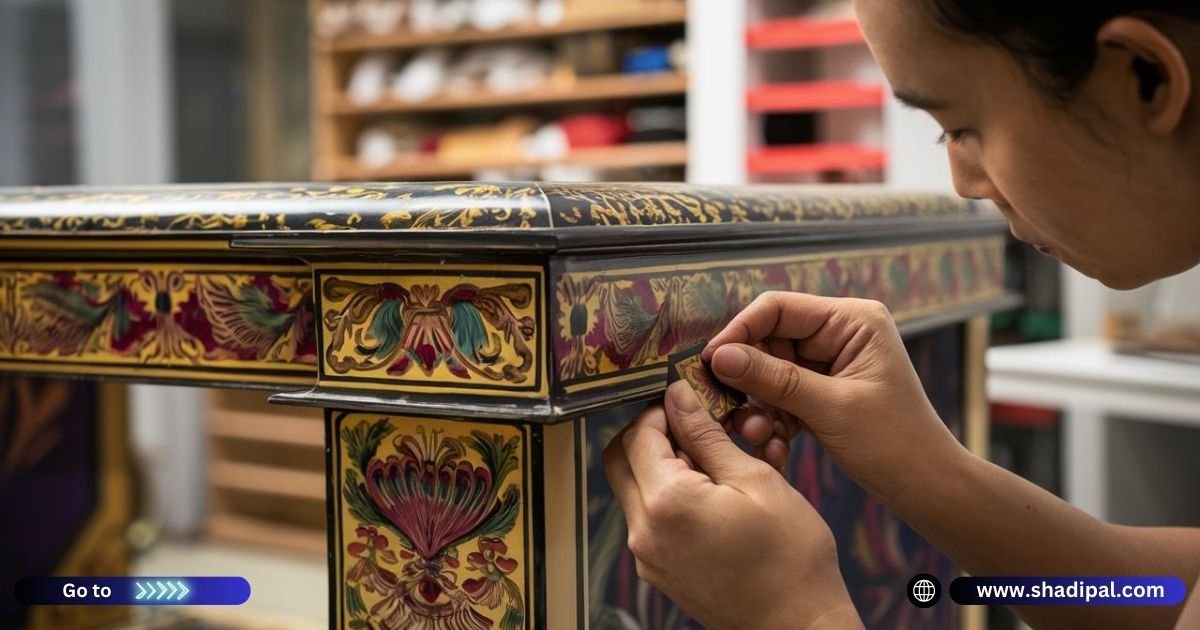
When applying the transfer, peel off the backing paper carefully and place the adhesive side onto the furniture surface. Start from one edge, pressing it down gradually and smoothing it out with a burnishing tool or a credit card. This technique minimizes air bubbles and wrinkles. If air bubbles or wrinkles do appear, gently lift the transfer back and smooth it out again before pressing it down.
For corners and edges, take extra care. Trim the transfer slightly to fit rounded edges or use a sharp blade to make small incisions to help it mold around curves without tearing. Press firmly along the edges to secure adherence and use a soft cloth to ensure that no part of the transfer is left unpressed. It’s essential to avoid common mistakes such as tearing or misaligning the transfer. Regularly step back and review the alignment during the process to correct any issues promptly.
Visual aids or images would greatly aid comprehension, demonstrating each meticulous step clearly. This structured approach ensures a smooth application, preserving the elegance and charm that furniture transfers bring to home decor.
Finishing and Protecting Your Transfer
Ensuring the longevity and durability of your applied transfer for furniture involves meticulous finishing and protection. Once the transfer is properly positioned and adhered to the furniture, you need to seal it to shield it from damage and wear. Two popular protective finishes are clear wax and polyurethane, each providing distinctive benefits.
Clear wax offers a subtle, matte finish, making it an excellent choice for vintage or shabby chic styles. To apply clear wax:
1. Use a soft, lint-free cloth or a wax brush to pick up a small amount of wax.
2. Gently rub the wax onto the surface in circular motions, covering the entire area with a thin, even layer.
3. Allow the wax to dry for at least 24 hours, then buff the surface to achieve a desired sheen level using a clean cloth.
Polyurethane, on the other hand, provides a more durable, glossy finish, ideal for high-traffic furniture pieces. To apply polyurethane:
1. Stir the polyurethane gently to avoid creating bubbles, then use a high-quality brush or foam applicator.
2. Apply a thin coat in long, even strokes, working in the direction of the wood grain.
3. Let it dry according to the manufacturer’s instructions, usually between 2 to 4 hours.
4. Lightly sand the surface with fine-grit sandpaper before applying additional coats. Multiple layers might be necessary for optimal protection.
For maintenance, regularly dust the transferred furniture with a soft cloth to prevent dirt accumulation. When needed, lightly clean the surface with a damp cloth and mild soap. Avoid using harsh chemicals or abrasive cleaners as they can damage the finish.
Over time, issues such as minor scratches or dulled finishes might arise. For waxed surfaces, reapply a thin layer of wax and buff as needed. For polyurethane finishes, clean thoroughly and apply a fresh coat of polyurethane to revive its appearance.
By taking these steps to finish and protect your furniture transfers, you can ensure they remain vibrant and intact, significantly extending the life of your beautifully customized pieces.